
This weeks assignment was to make a 3d mold with the CNC machine and make a composite casting. So I chose to make an "elevator" the idea of it is to lift my inkjet printer up 3 inches, so I can make a lasercut drawer that would fit under it for storing all the stuff goes with the printer, ink cartdriges, paper and etc. I designed the model for it with Fusion 360, because it also has the support for making the CAM files for actually cutting it out.

some of the equipment for the process include clingy film, two part epoxy resin, and unexpectedly a back scratcher by the spanish inquisition. The benefit of having the kind of pumps we have on the epoxy canisters, is that one needs just one push of each to have the proper amounts of each for mixing. No need to play around with scales and such to measure out the exact amounts.

Since we are going to be using a good deal of epoxy, everything needs to be extremely well covered with protective plastic.

The mould needs to be covered well in the clingy film, as while we want to use it for casting, we dont want the composite the actually stick to it. In this picture is when I have my mold, and the material I will use for the assignment ready.
In all the castings I have observed, people always used pretty much their mixing stick to spread the epoxy on the layers. To me this felt inefficient, so I tried a different approach.


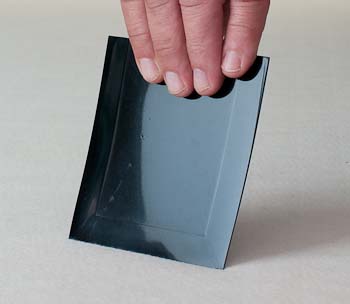
Instead of slathering the epoxy on the weave, I used the green piece of scrap plexi as a squeegee at a very tight angle. The width of the piece ensured that as I pulled it along the material the epoxy wouldnt escape as easily from the sides, while the tight angle forced the epoxy into the fiber.
Also instead of having the fiber on top of the other layers when applying the resin I had it on the covered desk surface, giving me a hard solid surface to press against, this felt that it made applying the resin even more efficient. For future it would be my recommendation that there is a large low rimmed plastic basin, that would make it easier to apply the resin neatly, while keeping the excess resin contained enough that it gets applied to the next piece while being processed.

As I was looking for the safety datasheets for the resin, I found on the supplier's page a squeegee specially designed for using with epoxy. Once the epoxy dries after use you can just wiggle it to make the cured epoxy fall off, making it reusable.
The original piece I designed was way too big to be efficiently covered with the fiber, not to mention would have taken a huge amount of resin. So I simply sliced it in half. The purpose of the piece is to be a shelf for my inkjet printer, so I figure the halved size of the piece is enough for the body of the printer sit on it. It might not be as stable as the piece would have been as a whole, but for the purpose of this assignment its enough.

After I had laid all my layers on the piece, in total of 5 layers; after all its just holding up a inkjet, not me. We applied clingy film punctured with the back scratcher, but instead of making the film resemble swiss cheese I ran the spikes over the film just once. The benefit of this was that the white fuzz, that was used to give the vacuum a chance to suck all the air out of the vacuum bag, did not cling too hard to the fresh epoxy under the cling film. Resulting in a item that was easy to scrub clean.


The paperwork
- Assesment
- Have you, Shown how you made your mould and created the composite?
- Have you, Described problems and how you fixed them?
- Have you, Included your design files and ‘hero shot’ photos of the mould and the final part?
- Have you, Read and linked to the material safety data sheet (MSDS) and technical data sheet (TDS) for the resins that you're using?
- Lecture Details
- Lecture Video
- Review Video
- The Files
Sub-pages
-
 Computer-Controlled Machining
Designing something BIG
-
 The CAM process
How to make the command file for the CNC machine
-
 The cutting
Running the command file, and cutting out the table.


Milling
When starting the CNC job, we initially had problems getting the machine to co-operate, becuse the mold was so deep that the machine thought there wasnt enough room over the piece. We had to remove the thick protective wood slab to bring the piece down enough for the machine to accept.
Acknowledgement
The video of resin being mixed is of eikka preparing a batch for his composite assignment.