Fab ISP

First the board needed to be made, and we used the Roland SRM-20 for it. We used fab modules for making the initial cut files. First I used toolwidth of 0.4mm, but the path did not look right, looked like there were something missing.Then I used 0.2mm toolwidth and now things started to look better.

0.4mm toolwidth

0.2mm toolwidth
Then it was time to run the cut, and get the board.

Milling the board

Traces Done

then it needed to be cut out, and for that I used a 1mm bit in the roland, but it also needed a separate path file for the mill.
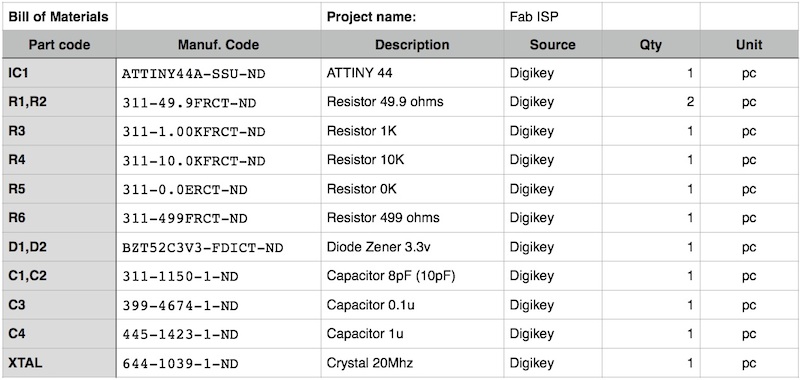
Unfortunately Andy never supplied a proper bom for the things needed for the fabISPkey, so I did have to do some searching. I found the page by Basile Fiore that had a proper bill of materials for it.
Then I just soldered the parts on to it. Then I had to go through the board with a multimeter, checking for short circuits. By a fortunate accident I had placed the diodes the right way around, as I didnt notice they had a line on them

Programming I did with an ancient Raspberry Pi 1B I had laying around, as it was easier to do with a linux machine. While the guide for programming did have sections for windows, my winblows 10 did not co-operate when I tried to make the hex file. Later on I upgraded to Raspberry Pi Zero, as it is a full linux computer, costs only few bucks, and as such is expendable. As long as nothing happens to the micro SD card, I can just toss the board if it fries.

Initially I tried programming the chip through bitbang, with a FTDI cable, but it refused to co-operate. Also since I did the work in the middle of the night at home I couldnt head off to the lab to check my soldering for issues. One of the problems I had was that the AVRdude version available for the raspi was a older version with no support for the cable, and the latest version was not available at the time.
I have later then figured this problem out and now have the latest version of the AVRdude in my Raspberry Pi Zero W. the problem was that I had to manually compile the AVRdude, and as I had never done that I had no clue on how to do it. I have included the guide for using raspi for programming the sticks in the side links.
For later windows usage, I found out that by installing the Adafruit drivers I linked in the side, it is possible to easily make the AVRdude work with windows.
I did try programming the chip through AVR dragon, but it kept complaining that the rst pin did not respond. Until I finally used a fabISP made by Jani Ylioja. With it the programming went through without a hitch.

With all the boards I have made, I found out that the best way to clean a board is to use soaped steelwool, usually meant for scrubbing pots and pans. It is gentle enough that it doesnt damage the board, but still scrubs off the protective layer.
The paperwork
- Assesment
- Have you, Shown how you made and programmed the board?
- Have you, Explained any problems and how you fixed them?
- Have you, Included a ‘hero shot’ of your board?
- Lecture Details
- Lecture Video
- Review Video
- The Files
Sub-pages
-
 Board manufacturing guide
Instructions to preparing the files for milling.
-
Board Programming Guide
Instructions programming the stick
-
 Adafruit Drivers
I found it useful to install the Adafruit drivers, they offer support for the ISP keys we made, and also installs all the files one needs to successfully use the isp key with avrdude in windows.
Learning Outcomes
-
 FabISPkey 2.3
For this week's assignment I chose to make the FabISPkey 2.3, originally designed by Andy, Unfortunately the pages for this got deleted. But fortunately for experimenting purposes I made a second one. Since the one made by Andy was deleted, I will include its files here.
-
 FabTiny*ISP
As my second programmer I made a Fabtiny*ISP, as I wanted to experiment with the ATtiny45 chip. Also it was an opportunity to prove the first one I made was a functional one. I will include its files in in case someone deletes the original page.

AVR Origin
Another side project of mine, to solve the chiken or the egg problem. A hat for raspberry PI zero, that lets the user use the capacities of the raspi to program the first programming stick. It also makes the FTDI cable optional.

ISP advanced
For my 3rd programmer I designed the thing from scratch, I couldnt make it small enough to fit the formfactor of an USB key I added a mini USB B plug to it. It uses the firmware for the FabISPkey. It also has switchable power for 3.3v chips, and on it I attempted to use PDI programming as well, but it takes more than adding the pins. Still I believe it is possible to use an ISP based programmer stick for PDI programming, and developing a version for the fablab network would be worth the effort.
I think for the next version of this I will use the ATTiny841 chip, it might have enough capacity for both ISP and PDI programming. Altough probably cannot be on the same stick like I originally intended.